How to install and configure TOMCAT server with Eclipse?
Download and Install Tomcat
For Windows
- Go to http://tomcat.apache.org ⇒ Under "Tomcat 8.5.{xx} Released" (where
{xx}is the latest upgrade number) ⇒ Downloads ⇒ Under "8.5.{xx}" ⇒ Binary Distributions ⇒ Core ⇒ "ZIP" package (e.g., "apache-tomcat-8.5.{xx}.zip", about 9 MB). - Create your project directory, say "
d:\myProject" or "c:\myProject". UNZIP the downloaded file into your project directory. Tomcat will be unzipped into the directory "d:\myProject\apache-tomcat-8.0.{xx}". - For ease of use, we shall shorten and rename this directory to "
d:\myProject\tomcat".
Take note of Your Tomcat Installed Directory. Hereafter, I shall refer to the Tomcat installed directory as.
For Mac OS
- Go to http://tomcat.apache.org ⇒ Under "Tomcat 8.5.{xx} Released" (where
{xx}is the latest upgrade number) ⇒ Downloads ⇒ Under "8.5.{xx}"⇒ Binary distribution ⇒ Core ⇒ "tar.gz" package (e.g., "apache-tomcat-8.0.{xx}.tar.gz", about 9 MB). - To install Tomcat:
- Goto "
~/Downloads", double-click the downloaded tarball (e.g., "apache-tomcat-8.0.{xx}.tar.gz") to expand it into a folder (e.g., "apache-tomcat-8.0.{xx}"). - Move the extracted folder (e.g., "
apache-tomcat-8.0.{xx}") to "/Applications". - For ease of use, we shall shorten and rename this folder to "tomcat".
- Goto "
Take note of Your Tomcat Installed Directory. Hereafter, I shall refer to the Tomcat installed directory as
For academic learning, I recommend "zip" (or "tar.gz") version, as you could simply delete the entire directory when Tomcat is no longer needed (without running any un-installer). You are free to move or rename the Tomcat's installed directory. You can install (unzip) multiple copies of Tomcat in the same machine. For production, it is easier to use the installer to properly configure the Tomcat.
Create an Environment Variable JAVA_HOME
(For Windows)
You need to create an environment variable called "
JAVA_HOME" and set it to your JDK installed directory.- First, find your JDK installed directory. The default is "
c:\Program Files\Java\jdk1.8.0_{xx}", where{xx}is the upgrade number. Take note of your JDK installed directory. - To set the environment variable
JAVA_HOMEin Windows 7/8/10: Start "Control Panel" ⇒ System and Security (Optional) ⇒ System ⇒ Advanced system settings ⇒ Switch to "Advanced" tab ⇒ Environment Variables ⇒ System Variables ⇒ "New" ⇒ In "Variable Name", enter "JAVA_HOME" ⇒ In "Variable Value", enter your JDK installed directory as noted in Step 1. - To verify, RE-START a CMD shell (restart needed to refresh the environment) and issue:
SET JAVA_HOME
JAVA_HOME=c:\Program Files\Java\jdk1.8.0_{xx}
How to configure tomcat server in Eclipse IDE?
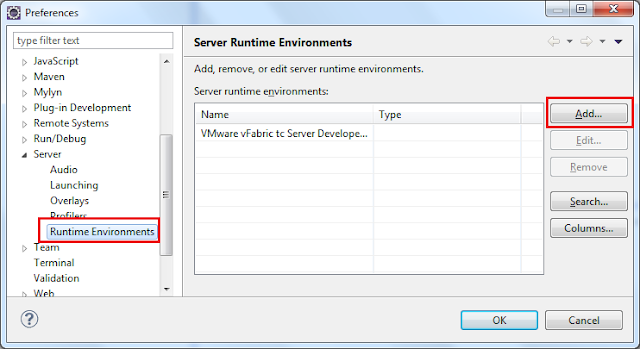
In Eclipse IDE, go to menu Window > Preferences. Then expand the Server > Runtime Environments node in the Preferences dialog:Click Add… to add a new server runtime environment. In the New Server Runtime Environment dialog, select Apache > Apache Tomcat v x.x and check the option Create a new local server:
Click Next. In the next screen, click the Browse button to specify the existing installation directory of Tomcat on your computer:
Click Finish, the selected Tomcat installation is added to the list of server runtime environments, as shown below:
Click OK to close the Preferences dialog, the new server runtime is added to the Servers view:
You can now drag and drop a project into this server in order to deploy and run the project.
NOTE: If you don’t see the Servers view, you can show it by go to the menu Window > Show View > Others…, then look for Servers.
Writing First Servlet:
1. Create Dynamic Web ProjectTo create a Servlet we need to create a new ‘Dynamic Web project’ which can be done in three ways,
- Right click on Project Explorer -> New -> Dynamic Web Project
- File menu -> New -> Dynamic Web Project
- Click on the down arrow on New icon on toolbar -> Dynamic Web Project
Click "Next" button.Click "Next" button.
Check 'Generate web.xml deployment descriptor' checkbox and click "Finish" button and Eclipse IDE will generate the web project automatically as shown below
2. Create Servlet Class
Select from the menu File --> New --> Servlet.
Write "com.srccodes.example" in the 'Java Package' field and "HelloWorld" in the 'Class Name' field. Click 'Next' button.
We can specify deployment descriptor (web.xml) specific information in the following screen. Just keep every thing as it is for the time being. Click "Next" button.
Click 'Next' button.Click 'Next' button.
Eclipse will generate a Servlet class based on the configuration / input we provided in the previous steps.
3. Write Custom Code
Add your code inside 'doGet' method. 'setContentType' method of HttpServletResponse sets content type of the response to 'text/html' which is the standard MIME content type for Html pages. 'getWriter' method of the response object returns a PrintWriter object. This will be used to print our "Hello World!" string in the browser.
Edit the generated 'HelloWorld.java' as per the following code.
File: HelloWorld.java
package com.srccodes.example;
import java.io.IOException;
import java.io.PrintWriter;
import javax.servlet.ServletException;
import javax.servlet.annotation.WebServlet;
import javax.servlet.http.HttpServlet;
import javax.servlet.http.HttpServletRequest;
import javax.servlet.http.HttpServletResponse;
/**
* Servlet implementation class HelloWorld
*/
@WebServlet("/HelloWorld")
public class HelloWorld extends HttpServlet {
private static final long serialVersionUID = 1L;
/**
* @see HttpServlet#HttpServlet()
*/
public HelloWorld() {
super();
// TODO Auto-generated constructor stub
}
/**
* @see HttpServlet#doGet(HttpServletRequest request, HttpServletResponse response)
*/
protected void doGet(HttpServletRequest request, HttpServletResponse response) throws ServletException, IOException {
response.setContentType("text/html");
PrintWriter printWriter = response.getWriter();
printWriter.println("
Hello World!
");
}
/**
* @see HttpServlet#doPost(HttpServletRequest request, HttpServletResponse response)
*/
protected void doPost(HttpServletRequest request, HttpServletResponse response) throws ServletException, IOException {
// TODO Auto-generated method stub
}
}
4. Run Your Servlet Code
Right click on the project 'HelloWorldServlet' and select from context menu 'Run As' --> 'Run on Server'.
Select the existing tomcat server.
Click "Finish" button. HelloWorldServlet web application will be deployed in the tomcat web server.
6. Browser Output
Eclipse will open a browser and your server side code will print 'Hello World!' in the browser.


Comments
Post a Comment